C++程式設計指南#
如果您是 pylon 的新使用者,Basler 建議您先閱讀 pylon C++ Programmer's Guide 的 Getting Started 章節,以熟悉 pylon C++ API。
C++ 程式設計範例#
The C++ samples are located in the C:\Program Files\Basler\pylon\Development\Samples\Stereo_ace\C++ folder.
The C++ samples are located in the /opt/pylon/share/pylon/Samples/Stereo_ace/C++/ folder.
The C++ samples are located in the /opt/pylon/share/pylon/Samples/Stereo_ace/C++/ folder.
建構範例的先決條件#
- pylon 26.06 或更高版本
- Visual Studio 2019 or above
- CMake 3.3 or above
- CMake 3.3 or above
- 選用:OpenCV 程式庫
- 選用:Point Cloud Library (PCL)
建置範例#
- Copy the Development\Samples\Stereo_ace\C++ folder to a location where you have write permissions.
- Launch Microsoft Visual Studio.
- Click the Open a local folder button, navigate to the Samples\Stereo_ace\C++ folder, and press the Select button.
Wait until Visual Studio has finished generating the CMake cache. Once the cache generation has succeeded, the samples can be built and executed.
Open a command shell and enter the following commands:
如果找不到 OpenCV 或 PCL,CMake 將只會略過需要該遺失程式庫的範例。其他範例仍可進行建置。
如果在建置和執行範例時遇到問題,請參閱 Troubleshooting 主題。
安裝 OpenCV Library#
You can download OpenCV here: https://github.com/opencv/opencv/releases
Make sure that you download a version of the OpenCV library that is compatible with the Visual Studio version you are going to use. If there is no suitable prebuilt version available, you have to build OpenCV from sources using the Visual Studio version you want to use for building your application.
If CMake fails to find OpenCV, set the OpenCV_DIR variable to the folder containing the OpenCVConfig.cmake file.
Examples
- Open the CMake Settings dialog (Project -> CMakeSettings for "Stereo ace samples")
- Enter the following command in the CMake command arguments field:
-DOpenCV_DIR="C:\Program Files\OpenCV\build\x64\vc16\lib" - Press Ctrl+S to save the changes.
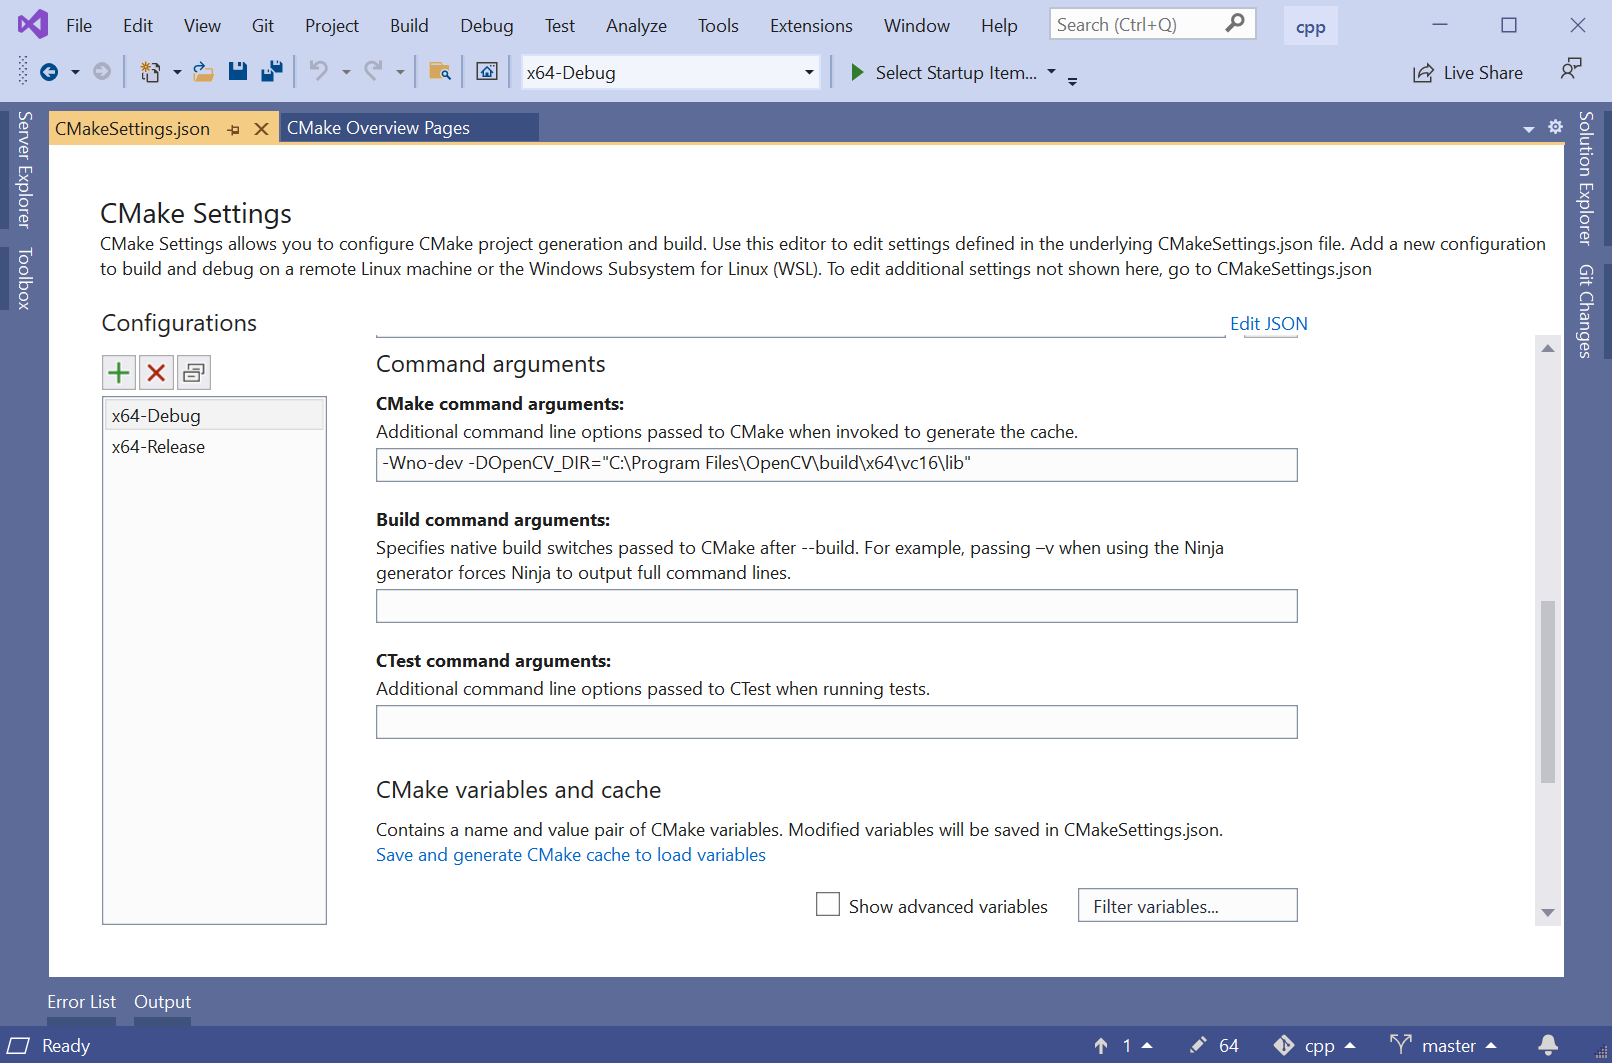
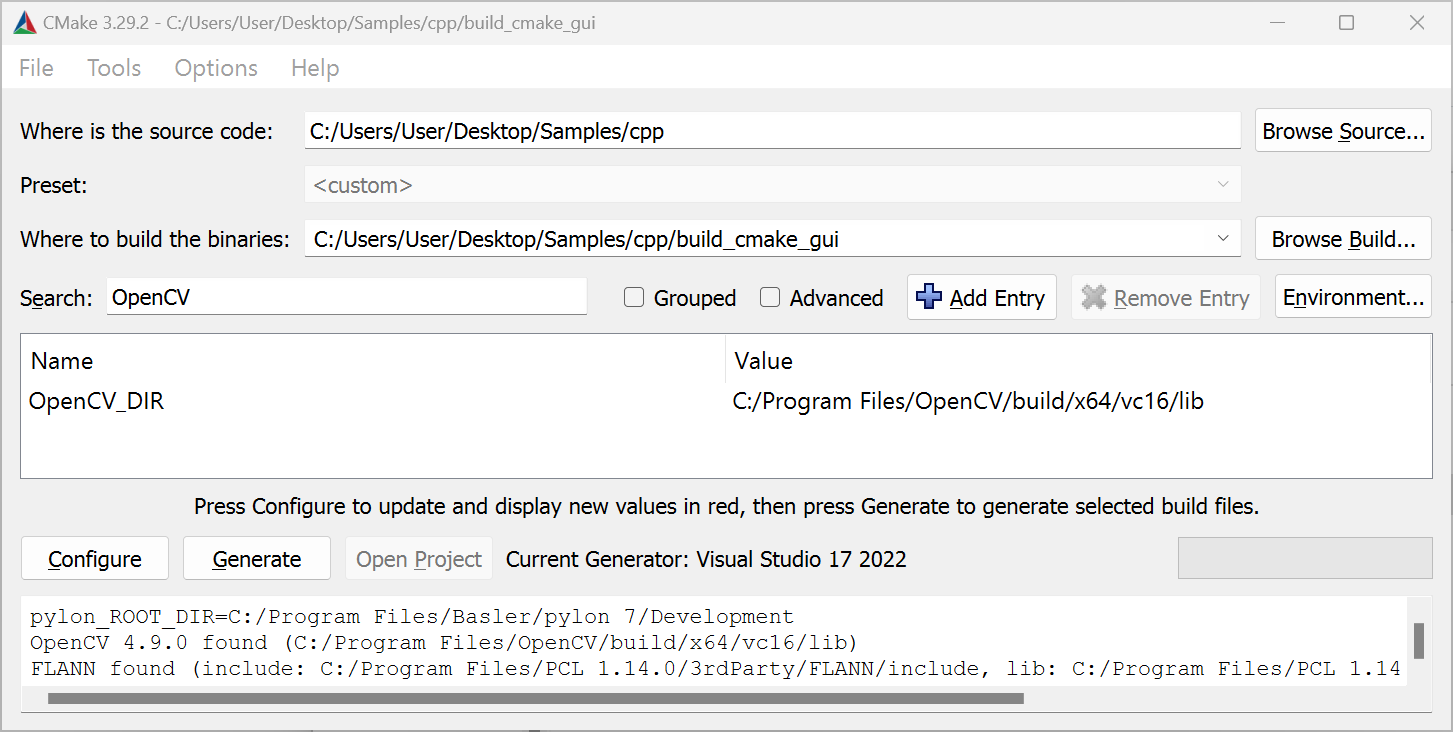
Before you can access the OpenCV_DIR in the CMake GUI, make sure that the Grouped check box is deselected in the CMake GUI.
Adding OpenCV to PATH Environment Variable#
You have to add the OpenCV bin directory to the PATH environment variable.
- Press the Win key.
- Type "environment".
- Click Edit environment variables for your account.
- In the User variables area, select Path.
- Click the Edit button.
- Click New.
- Enter the path of your OpenCV installation, e.g.:
C:\Program Files\OpenCV\build\x64\vc16\bin - Click OK.
If CMake fails to find the OpenCV library, you either have to install the libopencv development package or to build the OpenCV library from sources.
On Ubuntu systems, the libopencv development package can be installed by issuing the following command:
If you build the OpenCV library from sources and install it to a non-standard location, you can use the OpenCV_DIR CMake variable to specify the location where the OpenCVConfig.cmake files are located.
Example:
If CMake fails to find the OpenCV library, you either have to install the OpenCV development package or to build the OpenCV library from sources.
If you build the OpenCV library from sources and install it to a non-standard location, you can use the OpenCV_DIR CMake variable to specify the location where the OpenCVConfig.cmake files are located.
Example:
安裝 Point Cloud Library#
You can download the PCL All-in-one Installer for Windows here: https://github.com/PointCloudLibrary/pcl/releases
Make sure that you download a version of the PCL that is compatible with the Visual Studio version you are going to use.
If CMake fails to find the PCL, set the PCL_DIR variable to the folder containing the PCLConfig.cmake file.
Examples
- Open the CMakeSettings.json file (CMake -> Change CMake Settings -> "Stereo ace samples").
- Add
-DPCL_DIR=\"C:\\Program Files\\PCL 1.9.1\\cmake\"to thecmakeCommandArgslist:
- Open the CMake Settings dialog (Project -> CMakeSettings for "Stereo ace samples").
- Enter the following string in the CMake command arguments field:
-DPCL_DIR="C:\Program Files\PCL 1.14.0\cmake". - Press Ctrl+S to save the changes.
Before you can access the PCL_DIR in the CMake GUI, make sure that the Grouped check box is deselected in the CMake GUI.
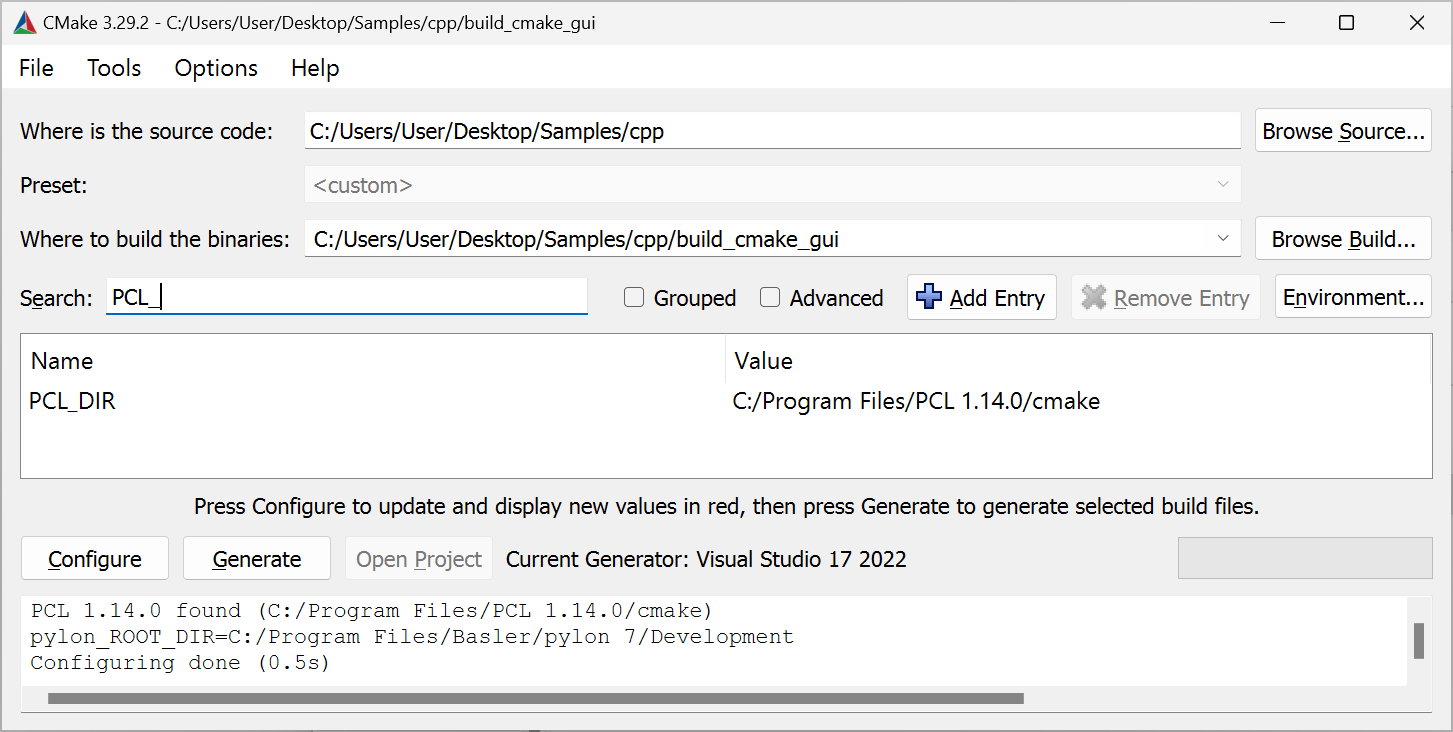
If the PCL is installed using the PCL All-in-one Installer, the installer takes care of adding the PCL bin directory to the PATH environment variable. If you're using a different installation method, you have to add the bin directory to the PATH environment variable yourself.
The PCL All-in-one Installer installs the OpenNI2.dll into the %ProgramFiles%\OpenNI2\Redist folder. The DLL is required at runtime. Either add this folder to your PATH environment variable, or copy the OpenNI2.dll to the folder the PCL binaries are located, e.g., %ProgamFiles%\PCL 1.13.0\bin.
If CMake fails to find the PCL library, you either have to install the libpcl development package or to build the PCL library from sources.
On Ubuntu systems, the libpcl development package can be installed by issuing the following command:
If you build the PCL from sources and install it to a non-standard location, the PCL_DIR CMake variable can be used to specify the location where the PCLConfig.cmake files is located.
Example:
Info
Samples using the Point Cloud Library (PCL) may crash depending on the versions of the PCL and VTK libraries installed on your system. The crash is due to a bug in the VTK libraries that are used by PCL for 3D visualization.
Source: https://github.com/PointCloudLibrary/pcl/issues/5237
Solution: PCL 1.13.1 contains fixes to work around the VTK bug.
Update to PCL 1.13.1 or higher. If required, uninstall the PCL libraries provided by your Linux distribution and build PCL version 1.13.1 or higher from sources (these can be retrieved from https://github.com/PointCloudLibrary/pcl).
If CMake fails to find the PCL library, you either have to install the PCL development package or to build the PCL library from sources.
If you build the PCL from sources and install it to a non-standard location, the PCL_DIR CMake variable can be used to specify the location where the PCLConfig.cmake files is located.
Example:
Info
Samples using the Point Cloud Library (PCL) may crash depending on the versions of the PCL and VTK libraries installed on your system. The crash is due to a bug in the VTK libraries that are used by PCL for 3D visualization.
Source: https://github.com/PointCloudLibrary/pcl/issues/5237
Solution: PCL 1.13.1 contains fixes to work around the VTK bug.
Update to PCL 1.13.1 or higher. If required, uninstall the PCL libraries provided by your Linux distribution and build PCL version 1.13.1 or higher from sources (these can be retrieved from https://github.com/PointCloudLibrary/pcl).
範例清單#
- FirstSample:介紹如何操作 Stereo ace 相機並擷取 3D 資料。
- ParametrizeCamera:說明如何存取相機參數。
- DeviceRemovalHandling:說明如何處理裝置移除。
- OpenDeviceByIpAddress:示範如何透過其中一個 IP 位址開啟 Stereo ace 相機。
- GrabDepthMap:說明如何擷取和解讀深度圖。
- SavePointcloud:說明如何在不使用 OpenCV 的情況下,將彩色點雲儲存至 .ply 檔案。
- SavePointcloudCV:說明如何使用 OpenCV 將強度影像、視差影像以及彩色點雲儲存至檔案。
- ShowPointcloud:說明如何將使用 Stereo ace 相機擷取的點雲視覺化。
- TriggerLowLatency:示範如何透過在相機上將強度和深度解析度設定為 High (2x2 Binning) 來降低延遲。
- LeftAndRightIntensity:示範如何從 Stereo ace 相機擷取左側和右側強度影像。
如需更多詳細資料,請參閱 C++ 範例目錄中的範例程式碼。
如何建構應用程式#
Using Visual Studio Solutions#
Refer to the Common Settings for Building Applications with pylon section of the pylon C++ Programmer's Guide to learn how to set up a project for building applications using pylon.
使用 CMake#
適用於 Stereo ace 的 pylon Supplementary Package 包含一個 Findpylon.cmake 模組,用於決定 pylon 以及適用於 Stereo ace 的 pylon Supplementary Package 的安裝位置。此尋找模組會匯出 pylon::pylon CMake 目標。將此目標作為引數傳遞給 target_link_libraries, CMake 將會負責設定 include 路徑、library 路徑等。
基本的 CMakeLists.txt CMake 檔案可能看起來像這樣:
project (hello)

# Locate the CMake find module for pylon ...
# for Unix systems. All other OS PYLON_ROOT will be empty.
list(APPEND CMAKE_PREFIX_PATH $ENV{PYLON_ROOT})
# for Windows systems. All other OS PYLON_DEV_DIR will be empty.
list(APPEND CMAKE_PREFIX_PATH $ENV{PYLON_DEV_DIR})

find_package(pylon 12.0 REQUIRED)

add_executable(hello helloworld.cpp)
target_link_libraries(hello pylon::pylon)
project (hello)

# Locate the CMake find module for pylon ...
# for Unix system. All other OS PYLON_ROOT will be empty
list(APPEND CMAKE_PREFIX_PATH $ENV{PYLON_ROOT})
# for Windows system. All other OS PYLON_DEV_DIR will be empty
list(APPEND CMAKE_PREFIX_PATH $ENV{PYLON_DEV_DIR})

find_package(pylon 12.0 REQUIRED)

add_executable(hello helloworld.cpp)
target_link_libraries(hello pylon::pylon)
project (hello)

# Locate the CMake find module for pylon ...
# for Unix system. All other OS PYLON_ROOT will be empty
list(APPEND CMAKE_PREFIX_PATH $ENV{PYLON_ROOT})
# for Windows system. All other OS PYLON_DEV_DIR will be empty
list(APPEND CMAKE_PREFIX_PATH $ENV{PYLON_DEV_DIR})

find_package(pylon 12.0 REQUIRED)

add_executable(hello helloworld.cpp)
target_link_libraries(hello pylon::pylon)
Stereo ace 的 Instant Camera 類別#
pylon 提供了不同類型的類別,用於存取攝影機裝置。除了低階的 IPylon 裝置之外,還有所謂的 Instant Camera 類別,為相機提供了方便的高階 API。
當 Pylon::CInstantCamera 類別提供對所有 Basler 相機的通用存取。
對於 Stereo ace 相機,適用於 Stereo ace 的 pylon Supplementary Package 包含 Pylon::CStereoAceInstantCamera 類別。Basler 建議針對 Basler Stereo ace 相機使用此類別,因為它提供了便利的參數存取以及 Stereo ace 專屬功能。
如果您使用 CBaslerUniversalInstantCamera 類別而非 CStereoAceInstantCamera 類別,您仍然可以設定和取得 Stereo ace 相機所提供的所有相機參數。如果 CBaslerUniversalInstantCamera 類別的存取子物件,請使用所謂的 通用參數存取 透過參數名稱來存取參數,正如 通用參數存取 pylon C++ Programmer's Guide 的章節。
範例:
using namespace Pylon;
GenApi::INodeMap& nodemap = camera.GetNodeMap();
CIntegerParameter depthSeg(nodemap, "BslDepthSeg" );
std::cout << "Segmentation: " << depthSeg.GetValue() << std::endl;
開啟與存取 Stereo ace 相機#
建立並開啟 Stereo ace 相機物件只需三個步驟:
- 為您想要存取的相機建立相機物件。
通常,您應該建立Pylon::CStereoAceInstantCamera類別的執行個體。 - 如果需要,請註冊 Stereo ace 專屬的組態事件處理常式(詳細資料請參閱 DeviceRemovalHandling.cpp 範例)。
- 呼叫
Open()方法以建立與相機裝置的連線。
以下範例說明了這些步驟:
#include <pylon/PylonIncludes.h>
#include <pylon/StereoAceInstantCamera.h>
using namespace Pylon;

// ...

// Before using any pylon methods, the pylon runtime must be initialized.
PylonInitialize();

try {
    // 1: Create a camera object for the first available Stereo ace camera.
    CUniversalInstantInterface instantInterface(
        CInterfaceInfo().SetDeviceClass(Pylon::BaslerGenTlStaDeviceClass));
    CStereoAceInstantCamera camera(instantInterface.CreateFirstDevice());

    // 2. Register a default configuration if available (see samples).
    // camera.RegisterConfiguration(...);

    // 3. Open the camera, i.e., establish a connection to the camera device.
    camera.Open();

    // Use the camera.
    std::cout << "Connected to camera "
        << camera.GetDeviceInfo().GetFriendlyName() << std::endl;
    // ...

    // Close the connection.
    camera.Close();
} catch (const GenICam::GenericException& e) {
    std::cerr << "Exception occurred: " << std::endl
        << e.GetDescription() << std::endl;
}

// Releases all pylon resources.
PylonTerminate();
發生錯誤時,將會擲回繼承自 GenICam::GenericException 的例外狀況。
典型錯誤狀況:
- 找不到 Stereo ace 相機:
CreateFirstDevice()函式會擲回例外狀況。 - 無法開啟相機,例如因為它已被其他應用程式開啟:
Open()方法會擲回例外狀況。
以下小節提供了關於如何建立和開啟相機物件更詳細的資訊。
為第一個可用的 Stereo ace 相機建立相機物件#
請使用 Pylon::CTlFactory::CreateFirstDevice() 方法來為第一個可用的 Stereo ace 相機建立相機物件。務必指定 Stereo ace 相機的 pylon 裝置類別識別碼以防止 CreateFirstDevice() 為不同類型的相機建立相機物件:
CUniversalInstantInterface instantInterface(
    CInterfaceInfo().SetDeviceClass(Pylon::BaslerGenTlStaDeviceClass));
CStereoAceInstantCamera camera(instantInterface.CreateFirstDevice());
如果找不到 Stereo ace 相機,請檢查相機和網路介面卡的 IP 組態設定。有關設定網路的更多資訊,請參閱 Basler Product Documentation 中的 Network Configuration 主題。
為特定 Stereo ace 相機建立相機物件#
如果您想要開啟特定的 Stereo ace 相機,除了裝置類別之外,您還可以指定其他屬性。
若要透過序號開啟特定的 Stereo ace 相機,請使用以下程式碼行:
CUniversalInstantInterface instantInterface(
    CInterfaceInfo().SetDeviceClass(Pylon::BaslerGenTlStaDeviceClass));
CStereoAceInstantCamera camera(instantInterface.CreateFirstDevice(
    CDeviceInfo().SetSerialNumber("40410842")));
若要透過使用者定義的名稱開啟 Stereo ace 相機,請使用以下程式碼行:
CUniversalInstantInterface instantInterface(
    CInterfaceInfo().SetDeviceClass(Pylon::BaslerGenTlStaDeviceClass));
CStereoAceInstantCamera camera(instantInterface.CreateFirstDevice(
    CDeviceInfo().SetUserDefinedName("MyCamera")));
使用者自訂名稱
您可以透過以下方式為相機指定使用者自訂名稱: DeviceUserID 參數。您可以在 pylon 3D Viewer 或 pylon API 中執行此操作:
透過 IP 位址建立裝置
目前,您無法使用以下項目指定相機 IP 位址: CreateFirstDevice() function。這樣做的原因是目前 Pylon::CDeviceInfo() class 不包含任何關於相機 IP 位址的資訊。
當 OpenDeviceByIpAddress 此範例示範如何透過其中一個 IP 位址開啟 Stereo ace 相機。
如果找不到所需的 Stereo ace 相機,請檢查您是否使用了正確的屬性值,並檢查相機與網路介面卡的 IP 設定。有關設定網路的更多資訊,請參閱 Basler 產品說明文件中的 Network Configuration 主題。
列舉 Stereo ace 相機#
以下程式碼片段說明如何取得所有已連接的 Stereo ace 相機清單。對於清單中的每個元素,系統會開啟相機並列印出部分相機參數值。
#include <pylon/PylonIncludes.h>
#include <pylon/StereoAceInstantCamera.h>
#include <ostream>
using namespace Pylon;

// ....

// Before using any pylon methods, the pylon runtime must be initialized.
PylonInitialize();

// ....

// Enumerate all Stereo ace cameras.
CTlFactory& TlFactory = CTlFactory::GetInstance();
DeviceInfoList_t lstDevices;
DeviceInfoList_t filter;
filter.push_back(CDeviceInfo().SetDeviceClass(BaslerGenTlStaDeviceClass));
TlFactory.EnumerateDevices(lstDevices, filter);
if (!lstDevices.empty()) {
    DeviceInfoList_t::const_iterator it;
    for (it = lstDevices.begin(); it != lstDevices.end(); ++it) {
        std::cout << it->GetFullName();

        // Open camera, i.e., establish a connection to the camera device.
        CStereoAceInstantCamera camera(CTlFactory::GetInstance().CreateDevice(*it));
        // Optionally register configuration(s) here.
        camera.Open();

        // Print out some information.
        std::cout << "Connected to camera "
            << camera.GetDeviceInfo().GetFriendlyName() << std::endl;
        std::cout << "IP Address: "
            << camera.GevCurrentIPAddress.GetValue() << std::endl;
        std::cout << "User-defined name: "
            << camera.DeviceUserID.GetValue() << std::endl;
        std::cout << "Serial Number: "
            << camera.DeviceSerialNumber.GetValue() << std::endl;
}  // The connection will be closed automatically when leaving the scope here.
else {
    std::cerr << "No devices found!" << std::endl;
}
註冊相機組態處理常式#
pylon Instant Camera 類別允許您註冊組態事件處理常式物件,可用於在特定事件發生時(例如當」 Open() 方法被呼叫時)套用相機設定。
以下範例說明如何註冊套用其他設定的組態事件處理常式:
class MyConfigurationHandler : public StereoAceConfigurationEventHandler
{
public:
    // Sets exposure time to minimum possible value.
    void OnOpened(CStereoAceInstantCamera& camera) override
    {
        camera.ExposureTime.SetToMinimum();
    }
};

// ....

// Then, register configuration event handlers.
camera.RegisterConfiguration(
      new MyConfigurationHandler,
      RegistrationMode_Append, Cleanup_Delete);

// ....

camera.Open(); // Configurations will be applied.
有關 pylon 相機事件處理常式類別的更多資訊,請參閱 pylon C++ Programmer's Guide 中的 Instant Camera Event Handler Basics 節。
如果您不想透過提供設定事件處理常式來套用所需的設定,您可以在呼叫 CStereoAceInstantCamera::Open() 方法後的任何時間設定要變更的參數。
有關如何設定和取得相機參數值的資訊,請參閱 Parametrize Camera 節。
連接至相機#
建立相機物件並註冊組態事件處理常式後,會透過呼叫 CStereoAceInstantCamera::Open() 方法後的任何時間設定要變更的參數。
連線會保持開啟,直到呼叫 CStereoAceInstantCamera::Close() 方法為止。 CStereoAceInstantCamera 的解構函式會自動呼叫 Close() (如果尚未明確呼叫)。
如果相機未定期收到來自相機的心跳要求,相機將會關閉連線。若應用程式當機或被偵錯工具中斷,就會發生遺失心跳要求的情況。
參數化相機#
有關如何使用 pylon API 存取相機參數的熟悉方式,請參閱 pylon C++ Programmer's Guide 中的 Accessing Parameters 節。
pylon C++ 範例 Parametrize_NativeParameterAccess 與 Parametrize_GenericParameterAccess 說明了使用 pylon 存取相機參數的典型方法。
以下程式碼範例說明如何使用下列項目來設定與取得經常使用的 Stereo ace 專用相機參數: CStereoAceInstantCamera 類別的執行個體。
// Include files to use the pylon API
#include <pylon/PylonIncludes.h>
#include <pylon/StereoAceInstantCamera.h>

// Namespaces for using the pylon API and the Stereo ace camera parameters
using namespace Pylon;
using namespace StereoAceCameraParams_Params;


// Set the exposure time of the camera.
camera.ExposureTime.SetValue(5000); // us

// Set the gain.
camera.Gain.SetValue(0.0);

// Set the illumination mode (e.g., AlwaysActive, AlternateActive, Off).
camera.BslIlluminationMode.SetValue(BslIlluminationMode_AlwaysActive);

// Set the illumination strength (0.0 ... 1.0).
camera.BslIlluminationStrength.SetValue(1.0);

// Set the minimum and maximum depth for the working area.
camera.BslDepthMinDepth.SetValue(200); // mm
camera.BslDepthMaxDepth.SetValue(2000); // mm

// Set the output resolutions.
CEnumParameter(camera.GetNodeMap(), "BslDepthResolution").SetValue("High");
CEnumParameter(camera.GetNodeMap(), "BslIntensityResolution").SetValue("Full");

// The producer derives the internal binning and scaling settings automatically.

// Print out current parameter values.
std::cout << "Exposure Time            : "
    << camera.ExposureTime.GetValue() << std::endl;
std::cout << "Gain                     : "
    << camera.Gain.GetValue() << std::endl;
std::cout << "Illumination Mode        : "
    << camera.BslIlluminationMode.GetValue() << std::endl;
std::cout << "Illumination Strength    : "
    << camera.BslIlluminationStrength.GetValue() << std::endl;
std::cout << "Min Depth                : "
    << camera.BslDepthMinDepth.GetValue() << std::endl;
std::cout << "Max Depth                : "
    << camera.BslDepthMaxDepth.GetValue() << std::endl;
std::cout << "Depth Resolution         : "
    << CEnumParameter(camera.GetNodeMap(), "BslDepthResolution").ToString() << std::endl;
std::cout << "Intensity Resolution     : "
    << CEnumParameter(camera.GetNodeMap(), "BslIntensityResolution").ToString() << std::endl;
pylon 3D Viewer 提供了一個 Documentation 窗格。當您在 Features 窗格中選取相機參數時,Documentation 窗格會顯示所選參數的相關資訊,以及說明如何取得與設定該相機參數值的 C++ 和 C# 程式碼片段。
擷取資料#
請參閱 pylon C++ Programmer's Guide 的 Grabbing Images 一節,以熟悉如何使用 pylon API 擷取資料。
pylon 會將擷取的影像表示為稱為 GrabResults 的資料結構。由 Stereo ace 相機擷取的 GrabResults 包含多個元件。依預設,每個 GrabResult 會儲存強度影像、視差圖以及其他資訊。
// Enable disparity maps by enabling the Disparity component and setting the
// appropriate pixel format.
camera.ComponentSelector.SetValue(ComponentSelector_Disparity);
camera.ComponentEnable.SetValue(true);
有關更多詳細資訊,請參閱 Basler 產品說明文件中的 Component Selector 與 Pixel Format 主題。
擷取迴圈#
pylon 支援設定擷取迴圈的不同方法,並提供用於處理記憶體緩衝區的不同策略。
如需詳細資訊,請參閱 pylon C++ Programmer's Guide 的 Grabbing Images 一節。
以下程式碼片段說明使用以下項目的典型擷取迴圈: CStereoAceInstantCamera 類別:
#include <pylon/PylonIncludes.h>
#include <pylon/StereoAceInstantCamera.h>

using namespace Pylon;
using namespace StereoAceCameraParams_Params;


PylonInitialize();

CUniversalInstantInterface instantInterface(
    CInterfaceInfo().SetDeviceClass(Pylon::BaslerGenTlStaDeviceClass));
CStereoAceInstantCamera camera(instantInterface.CreateFirstDevice());
camera.Open();

size_t nBuffersGrabbed = 0;

// This smart pointer will receive the grab result data.
CGrabResultPtr ptrGrabResult;

camera.StartGrabbing();

while (camera.IsGrabbing() && nBuffersGrabbed < 10) {
    // Wait for an image and then retrieve it. A timeout of 1000 ms is used.
    camera.RetrieveResult(1000, ptrGrabResult, TimeoutHandling_ThrowException);

    // Data grabbed successfully?
    if (ptrGrabResult->GrabSucceeded()) {
        nBuffersGrabbed++;
        // Access the data.
        // ...existing code...
    } else {
        // Error handling
        std::cerr << "Grab error occurred: "
            << ptrGrabResult->GetErrorDescription() << std::endl;
    }
}
// Clean-up
camera.StopGrabbing();
camera.Close();
存取元件#
若要存取 GrabResult 的個別影像元件,請使用 Pylon::CGrabResultData::GetFirstImageDataComponent() 方法並指定所需的元件類型。該方法會傳回一個 Pylon::CPylonDataComponent ,其中包含影像資料(例如深度值)以及其詮釋資料。
將相機中的 throwIfNotFound 引數至 false (如果遺失的元件傳回無效元件而非擲回例外狀況)。請務必使用 CPylonDataComponent::IsValid() 方法,在存取其資料之前先檢查是否已找到要求的元件。
有關 pylon 如何提供對包含多個元件之 GrabResults 的存取的更多資訊,請參閱 pylon C++ Programmer's Guide「Advanced Topics」章節中的 Multi-Component Grab Results 節。
範例:
if (ptrGrabResult->GrabSucceeded()) {
    const auto intensityComponent =
        ptrGrabResult->GetFirstImageDataComponent(
            EComponentType::ComponentType_Intensity, 0, false);
    if (!intensityComponent.IsValid()) {
        throw std::runtime_error(
            "Buffer doesn't contain an intensity component.");
    }

    const auto disparityComponent =
        ptrGrabResult->GetFirstImageDataComponent(
            EComponentType::ComponentType_Disparity, 0, false);
    if (!disparityComponent.IsValid()) {
        throw std::runtime_error(
            "Buffer doesn't contain a disparity component.");
    }

} else {
    std::cerr << "Grab error: " << ptrGrabResult->GetErrorCode() << " "
              << ptrGrabResult->GetErrorDescription() << std::endl;
}