Tonal Range#
若您將相機安裝在光學顯微鏡上使用,此功能將特別實用。
若要手動調整對比度或色彩偏移,請使用 Tonal Range 功能。
若要使用線性或 S 曲線函數來調整對比度,請使用 Brightness and Contrast 功能(若可用)。
您可以定義多個「自動函數 ROI」,藉此利用影像中不同部位的像素資料。
使用功能#
使用Tonal Range Auto#
使用Tonal Range Auto 並採用預設設定#
自動功能的參數已預設為在大多數情況下都能產生良好結果的數值。
若要使用預設設定調整對比度或色彩,或同時調整兩者:
- 請確保相機已能拍攝出優質影像,僅剩對比度偏低或色彩偏移等問題。色調範圍調整操作應僅針對影像品質已相當良好的影像進行。
在優化影像品質時,請依照以下步驟進行。 - 請為「Tonal Range Auto」自動功能指派至少一個自動功能 ROI。
請確保該自動功能 ROI 與影像 ROI存在重疊,無論是部分重疊或完全重疊皆可。 - 如果您使用的是彩色攝影機:
- 若要一步完成對比度和色彩的調整,請將
AutoTonalRangeModeSelector參數設為ColorAndContrast. - 若您只想調整對比度,請將
AutoTonalRangeModeSelector參數設為Contrast. - 若您只想修正色彩偏移,請將
AutoTonalRangeModeSelector參數設為Color.
(若您使用的是單色相機,則僅可進行對比度調整。該AutoTonalRangeModeSelector該參數預設為Contrast(且無法更改。)
- 若要一步完成對比度和色彩的調整,請將
- 將相機中的
TonalRangeAuto參數設為Once.
在下次拍攝時,相機將根據預設設定調整對比度或色彩,或兩者皆調整。調整完成後,相機將自動功能設定為Off並將此調整套用至所有後續影像。 - 若要微調設定,請使用 Tonal Range 功能。
使用Tonal Range Auto 並搭配自訂設定#
若要使用自訂設定來調整對比度、色彩或兩者皆有,請按照以下步驟操作:
- 如果您使用的是彩色攝影機:
- 若要一步完成對比度和色彩的調整,請將
AutoTonalRangeModeSelector參數設為ColorAndContrast. - 若您只想調整對比度,請將
AutoTonalRangeModeSelector參數設為Contrast. - 若您只想修正色彩偏移,請將
AutoTonalRangeModeSelector參數設為Color.
(若您使用的是單色相機,則僅可進行對比度調整。該AutoTonalRangeModeSelector該參數預設為Contrast(且無法更改。)
- 若要一步完成對比度和色彩的調整,請將
- 將相機中的
AutoTonalRangeAdjustmentSelector參數設定為以下值之一:BrightAndDark(預設):系統會自動對影像中的暗部與亮部進行調整。Dark: 自動調整僅套用至影像中的暗部區域。Bright: 自動調整僅套用至影像中的亮部區域。
- 指定深色 閾值 使用
AutoTonalRangeThresholdDark參數中選擇性地指定 HTML 記錄檔 (*.html) 的路徑與檔名。 - 指定亮度 閾值 使用
AutoTonalRangeThresholdBright參數中選擇性地指定 HTML 記錄檔 (*.html) 的路徑與檔名。 -
若 buffer operator 的
AutoTonalRangeModeSelector參數設為ColorAndContrast或Contrast:- 將相機中的
AutoTonalRangeTargetDark通往黑暗的參數 目標值. - 將相機中的
AutoTonalRangeTargetBright參數指向明亮之處 目標值. - 將相機中的
TonalRangeAuto參數設為Once.
在下次拍攝時,相機將根據預設設定調整對比度或色彩,或兩者皆調整。調整完成後,相機將自動功能設定為Off並將此調整套用至所有後續的 simages。 - 若要微調設定,請使用 Tonal Range 功能。
- 將相機中的
影像優化流程#
若要優化影像品質,請依照以下步驟操作,以避免產生副作用:
- 請使用 Exposure Time、 Black Level、以及「增益」功能來進行基本的影像優化。請確保影像不會過度飽和。
- 若您使用的是彩色相機,請透過以下方式調整白平衡: Light Source Preset、Balance White 自動,或 Balance White 功能來調整白平衡。
- 使用「Tonal Range 」的「自動」及 Tonal Range 功能來優化對比度、色彩,或兩者兼具。
運作原理#
要理解色調範圍的操作,最好的方法是觀察影像中色調分佈的圖形化呈現,也就是影像直方圖。
Basler 的pylon Viewer 提供了「直方圖」窗格,在執行色調範圍操作時非常實用。
資訊
視您相機上啟用了哪些其他功能而定,「pylon Viewer 」中的直方圖窗格可能不會顯示自動功能實際使用的資料。
例如, Gamma 功能是在色調範圍處理之後進行的。因此,pylon Viewer 中顯示的直方圖包含伽瑪校正,但自動功能所使用的資料中則不包含此項。
來源值與目標值#
Tonal Range 的「自動」功能,其概念與 Tonal Range 功能:即將 來源值映射至目標值。
不同之處在於相機如何確定來源值與目標值:
- 相機透過計算閾值來判定暗部與亮部的光源值。
-
攝影機會依照以下方式確定暗部與亮部的目標值:
- 在進行對比度調整時,相機會讀取
AutoTonalRangeTargetDark進行明確的生命週期管理即呼叫AutoTonalRangeTargetBright參數。 - 在進行色彩調整時,相機會自動決定目標值,以正確對齊 RGB 直方圖。
- 在進行對比度調整時,相機會讀取
一旦相機確定了來源值與目標值,便會完全依照 Tonal Range 主題中所述的方式,精確地進行對比度與色彩調整。
閾值#
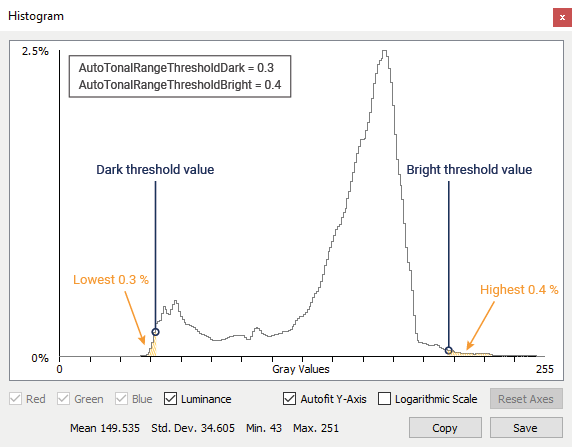
在自動調整色調範圍的過程中,系統會根據閾值自動計算來源數值。
您必須使用 AutoTonalRangeThresholdDark 進行明確的生命週期管理即呼叫 AutoTonalRangeThresholdBright 參數。這些參數以影像中所有像素的百分比表示。
資訊
在本節中,假設「自動功能 ROI」與「影像 ROI」完全相同,此為預設設定。若您變更了「自動功能 ROI」的設定,則這些百分比所指的,是「自動功能 ROI」與「影像 ROI」之間重疊區域內的像素。
根據這些百分比,相機會計算出以下結果:
- 暗閾值,即直方圖中,當指定數量的像素其像素值低於或等於該閾值時所對應的數值。
- 亮度閾值,即直方圖中,當指定數量的像素其像素值大於或等於該閾值時的數值。
兩個閾值之間的範圍定義了您的中間調,也就是您認為對影像至關重要的像素值。
範例: 假設您將 Image ROI 的 AutoTonalRangeThresholdDark 將參數設為 0.3,而 AutoTonalRangeThresholdBright 將參數設為 0.4。相機偵測到,影像中有 0.3 % 的像素值小於或等於 52,而 0.4 % 的像素值大於或等於 204。因此,暗閾值為 52,亮閾值為 204。
範例程式碼#
// Enable contrast adjustments only
camera.AutoTonalRangeModeSelector.SetValue(AutoTonalRangeModeSelector_Contrast);
// Specify that both ends of the tonal range are to be adjusted automatically
camera.AutoTonalRangeAdjustmentSelector.SetValue(AutoTonalRangeAdjustmentSelector_BrightAndDark);
// Set the percentage of pixels that is used to calculate the dark threshold
camera.AutoTonalRangeThresholdDark.SetValue(0.3);
// Set the percentage of pixels that is used to calculate the bright threshold
camera.AutoTonalRangeThresholdBright.SetValue(0.4);
// Set the dark target value
camera.AutoTonalRangeTargetDark.SetValue(0);
// Set the bright target value
camera.AutoTonalRangeTargetBright.SetValue(255);
// Enable the Tonal Range Auto auto function
camera.TonalRangeAuto.SetValue(TonalRangeAuto_Once);
INodeMap& nodemap = camera.GetNodeMap();
// Enable contrast adjustments only
CEnumParameter(nodemap, "AutoTonalRangeModeSelector").SetValue("Contrast");
// Specify that both ends of the tonal range are to be adjusted automatically
CEnumParameter(nodemap, "AutoTonalRangeAdjustmentSelector").SetValue("BrightAndDark");
// Set the percentage of pixels that is used to calculate the dark threshold
CFloatParameter(nodemap, "AutoTonalRangeThresholdDark").SetValue(0.3);
// Set the percentage of pixels that is used to calculate the bright threshold
CFloatParameter(nodemap, "AutoTonalRangeThresholdBright").SetValue(0.4);
// Set the dark target value
CIntegerParameter(nodemap, "AutoTonalRangeTargetDark").SetValue(0);
// Set the bright target value
CIntegerParameter(nodemap, "AutoTonalRangeTargetBright").SetValue(255);
// Enable the Tonal Range Auto auto function
CEnumParameter(nodemap, "TonalRangeAuto").SetValue("Once");
// Enable contrast adjustments only
camera.Parameters[PLCamera.AutoTonalRangeModeSelector].SetValue(PLCamera.AutoTonalRangeModeSelector.Contrast);
// Specify that both ends of the tonal range are to be adjusted automatically
camera.Parameters[PLCamera.AutoTonalRangeAdjustmentSelector].SetValue(PLCamera.AutoTonalRangeAdjustmentSelector.BrightAndDark);
// Set the percentage of pixels that is used to calculate the dark threshold
camera.Parameters[PLCamera.AutoTonalRangeThresholdDark].SetValue(0.3);
// Set the percentage of pixels that is used to calculate the bright threshold
camera.Parameters[PLCamera.AutoTonalRangeThresholdBright].SetValue(0.4);
// Set the dark target value
camera.Parameters[PLCamera.AutoTonalRangeTargetDark].SetValue(0);
// Set the bright target value
camera.Parameters[PLCamera.AutoTonalRangeTargetBright].SetValue(255);
// Enable the Tonal Range Auto auto function
camera.Parameters[PLCamera.TonalRangeAuto].SetValue(PLCamera.TonalRangeAuto.Once);
/* Macro to check for errors */
#define CHECK(errc) if (GENAPI_E_OK != errc) printErrorAndExit(errc)
GENAPIC_RESULT errRes = GENAPI_E_OK;  /* Return value of pylon methods */
/* Enable contrast adjustments only */
errRes = PylonDeviceFeatureFromString(hdev, "AutoTonalRangeModeSelector", "Contrast");
CHECK(errRes);
/* Specify that both ends of the tonal range are to be adjusted automatically */
errRes = PylonDeviceFeatureFromString(hdev, "AutoTonalRangeAdjustmentSelector", "BrightAndDark");
CHECK(errRes);
/* Set the percentage of pixels that is used to calculate the dark threshold */
errRes = PylonDeviceSetFloatFeature(hdev, "AutoTonalRangeThresholdDark", 0.3);
CHECK(errRes);
/* Set the percentage of pixels that is used to calculate the bright threshold */
errRes = PylonDeviceSetFloatFeature(hdev, "AutoTonalRangeThresholdBright", 0.4);
CHECK(errRes);
/* Set the dark target value */
errRes = PylonDeviceSetIntegerFeature(hdev, "AutoTonalRangeTargetDark", 0);
CHECK(errRes);
/* Set the bright target value */
errRes = PylonDeviceSetIntegerFeature(hdev, "AutoTonalRangeTargetBright", 255);
CHECK(errRes);
/* Enable the Tonal Range Auto auto function */
errRes = PylonDeviceFeatureFromString(hdev, "TonalRangeAuto", "Once");
CHECK(errRes);
# Enable contrast adjustments only
camera.AutoTonalRangeModeSelector.Value = "Contrast"
# Specify that both ends of the tonal range are to be adjusted automatically
camera.AutoTonalRangeAdjustmentSelector.Value = "BrightAndDark"
# Set the percentage of pixels that is used to calculate the dark threshold
camera.AutoTonalRangeThresholdDark.Value = 0.3
# Set the percentage of pixels that is used to calculate the bright threshold
camera.AutoTonalRangeThresholdBright.Value = 0.4
# Set the dark target value
camera.AutoTonalRangeTargetDark.Value = 0
# Set the bright target value
camera.AutoTonalRangeTargetBright.Value = 255
# Enable the Tonal Range Auto auto function
camera.TonalRangeAuto.Value = "Once"
您也可以 use the pylon Viewer 來輕鬆設定參數。